
SSH Over WireGuard on Ubuntu 24.04: Close Port 22 Without a Lockout

SSH over WireGuard on Ubuntu 24.04 keeps port 22 inside the tunnel with three server changes: a wg0 tunnel with the server at 10.91.0.1, ListenAddress 10.91.0.1 in /etc/ssh/sshd_config.d/ applied by reloading systemd and restarting ssh.socket, and a UFW rule for TCP 22 on wg0 only. Arm a rollback timer before the last two. With socket activation turned off, a config that passes sshd -t still locks you out at the next boot.
On a Hostry VPS you have root and a VNC console in the control panel. Key-only logins, a sudo user and an active UFW with OpenSSH allowed are assumed from the start; the hardening pass for a fresh Linux server sets those up.
The target layout for SSH over WireGuard
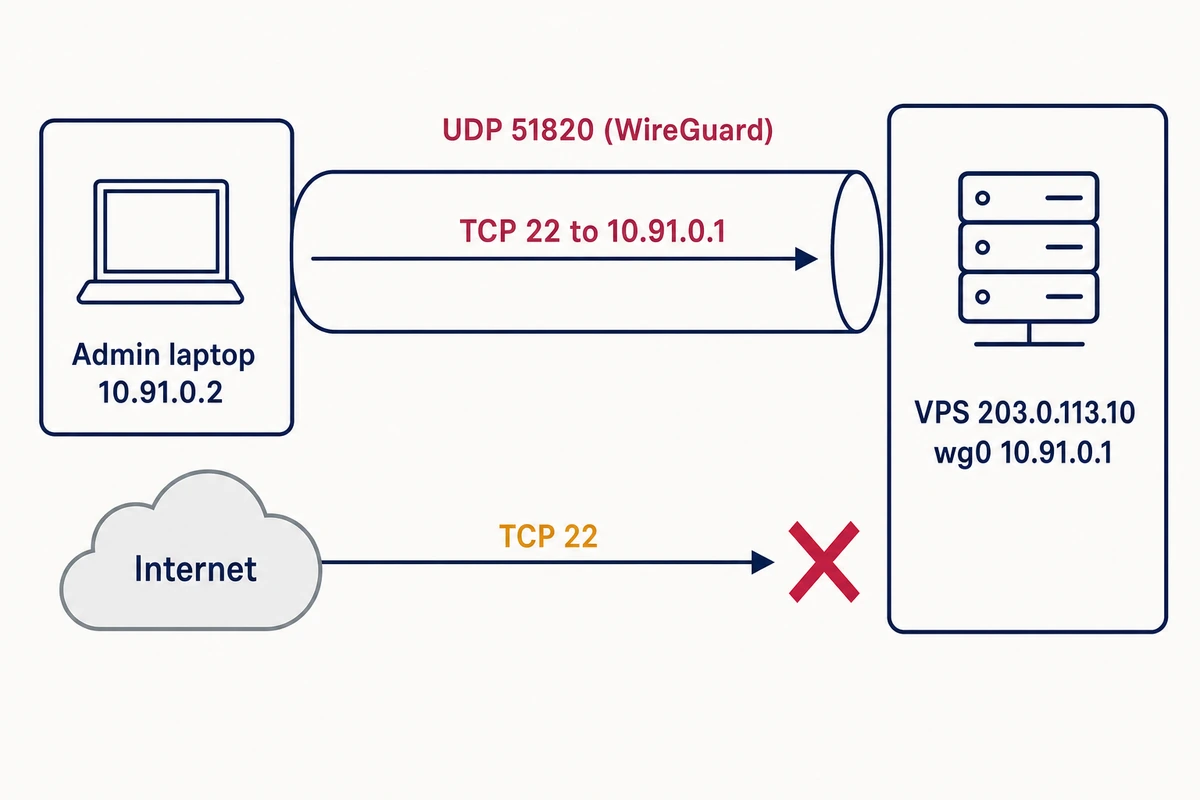
With SSH over WireGuard in place, the server’s public address 203.0.113.10 exposes one port for administration, UDP 51820 for WireGuard, and sshd answers only on 10.91.0.1 inside the tunnel. These are documentation addresses; substitute your own subnet, IP and user name (ops below).
- The admin laptop, 10.91.0.2 in the tunnel, reaches 10.91.0.1:22 through wg0.
- A connection to 203.0.113.10:22 from anywhere else gets no answer, because UFW drops the SYN and sshd does not listen on that address either.
You need:
- Ubuntu 24.04 with openssh-server 1:9.6p1-3ubuntu13.20, the noble-updates version at the time of writing (
dpkg-query -W openssh-servershows yours). - sshd in its default socket-activated mode:
systemctl is-enabled ssh.socket ssh.serviceprintsenabledand thendisabled. The cut-over and the rollback script work in this mode only; switch back first (the classic ssh.service section ends with the commands). - A Linux laptop with wireguard-tools, since the laptop commands use wg-quick.
- A console login that works: before you arm the timer, sign in on the VNC console with a password account (SSH keys are no help there) and keep it open through the cut-over and the reboot. If that login fails, stop here.
Command output was reproduced with OpenSSH 9.6p1, wireguard-tools 1.0.20210914 and ufw 0.36.2, and boot behavior in a QEMU virtual machine running Ubuntu 24.04 (kernel 6.8.0-149, systemd 255.4-1ubuntu8.18). Boot order on the official cloud image and on a provider’s network is not covered.
WireGuard AllowedIPs for one admin laptop
This tunnel links one laptop to one server, so the AllowedIPs entry on each side holds a single /32. Generate a key pair on each machine first.
# on the server and on the laptop (Ubuntu or Debian)
sudo apt install wireguard-tools
sudo -i
cd /etc/wireguard
umask 077
wg genkey | tee private.key | wg pubkey > public.key
In that root shell, write /etc/wireguard/wg0.conf with your editor; the umask keeps the file readable by root only. Each [Peer] takes the other machine’s public key, which cat /etc/wireguard/public.key prints on that machine.
# server: /etc/wireguard/wg0.conf
[Interface]
Address = 10.91.0.1/24
ListenPort = 51820
PrivateKey = <server private.key>

[Peer]
# admin laptop
PublicKey = <laptop public.key>
AllowedIPs = 10.91.0.2/32
# laptop: /etc/wireguard/wg0.conf
[Interface]
Address = 10.91.0.2/32
PrivateKey = <laptop private.key>
[Peer]
# VPS
PublicKey = <server public.key>
Endpoint = 203.0.113.10:51820
AllowedIPs = 10.91.0.1/32
PersistentKeepalive = 25If you also use the firewall in the Hostry control panel, open UDP 51820 there too before the first ping.
# server, root shell
ufw allow 51820/udp
systemctl enable --now wg-quick@wg0

# laptop, root shell
wg-quick up wg0
ping -c3 10.91.0.1
A working tunnel shows up on the server in wg show:
[...]
peer: henDvIbd5kGR25E+q82RUlhOgBeHjKHtKUcG6GR8EAk=
  endpoint: 203.0.113.20:40619
  allowed ips: 10.91.0.2/32
  latest handshake: 10 seconds ago
  transfer: 564 B received, 476 B sent
On the laptop, WireGuard AllowedIPs doubles as the route list. With 10.91.0.1/32, wg-quick sends only the server’s tunnel address into wg0, so traffic to 203.0.113.10 keeps using the normal link; a /24 would claim the whole subnet:
## AllowedIPs = 10.91.0.0/24
[#] ip -4 route add 10.91.0.0/24 dev wg0
## AllowedIPs = 10.91.0.1/32
[#] ip -4 route add 10.91.0.1/32 dev wg0
The server needs no NAT and no net.ipv4.ip_forward=1. 10.91.0.1 is a local address, so packets for it are delivered locally, and SSH over the tunnel worked with ip_forward = 0 in both the container and the VM.
Leave out two lines from VPN-router guides. MTU = 1420 pins a value that wg-quick computes anyway as the underlay MTU minus 80, which gave 1420 on a 1500-byte link and 1320 when the laptop’s link was set to 1400 (wg-quick(8) describes the automatic choice).
SaveConfig = true makes every wg-quick down, and so every reboot, rewrite wg0.conf from the live interface: a second peer appended to the file while wg0 was up was gone after the next down, along with the comments.
If a second admin joins later, append a [Peer] with 10.91.0.3/32 and run sudo systemctl reload wg-quick@wg0.
Bind sshd to the WireGuard address with ListenAddress
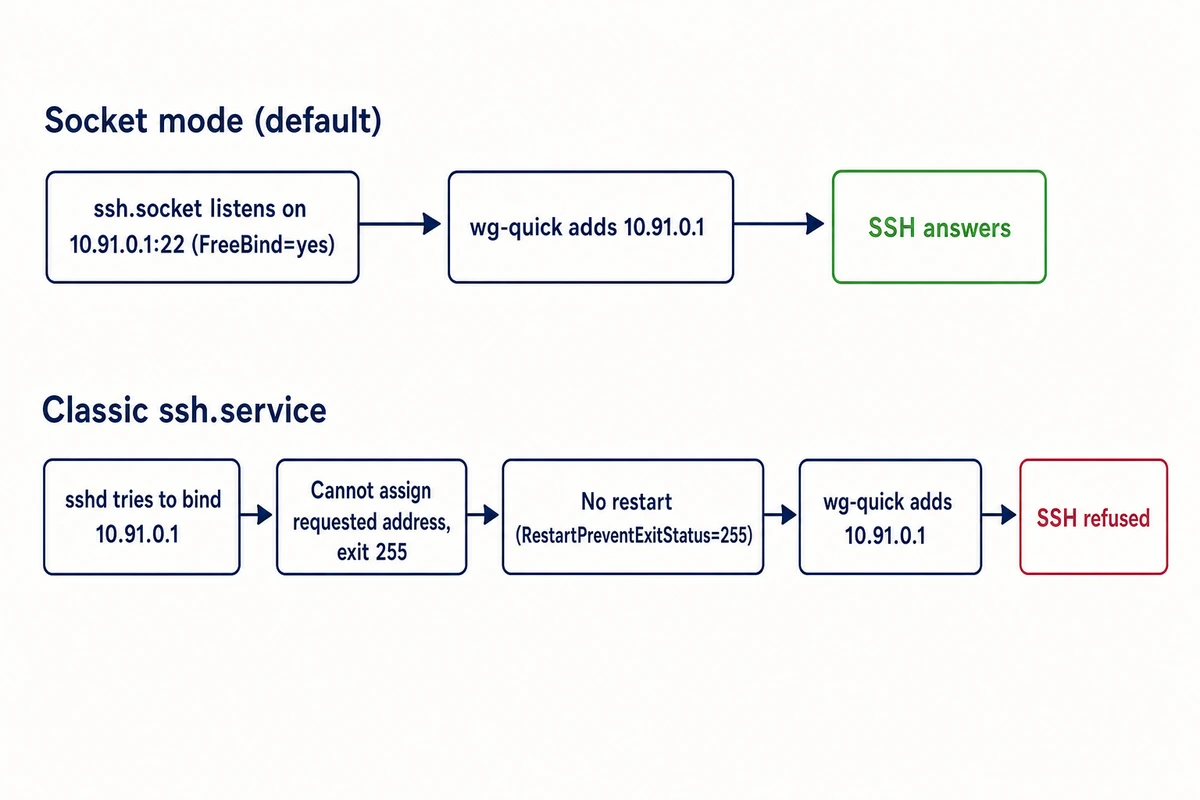
In the default socket mode on Ubuntu 24.04, systemd owns the listening socket. ListenAddress takes an address, not an interface name such as wg0, so to bind sshd to the WireGuard interface, step 3 adds ListenAddress 10.91.0.1 to /etc/ssh/sshd_config.d/10-wg-only.conf. A generator shipped with openssh-server writes the matching ssh.socket drop-in from it.
The generator runs at boot, on systemctl daemon-reload and on every openssh-server upgrade, whose postinst reloads systemd and restarts ssh.socket; sshd itself ignores ListenAddress in socket mode. A file created early therefore takes effect at the next boot or openssh-server upgrade, possibly with no rollback armed, so create it in the cut-over after arming the timer. After a reload or a boot, the VM showed this drop-in and merged socket:
--- /run/systemd/generator/ssh.socket.d/addresses.conf
# Automatically generated by sshd-socket-generator

[Socket]
ListenStream=
ListenStream=10.91.0.1:22
# systemctl show ssh.socket -p Listen -p FreeBind
FreeBind=yes
Listen=10.91.0.1:22 (Stream)
The generator writes only ListenStream= lines, so the rest of the shipped ssh.socket stays in force, FreeBind=yes included. That option lets a socket bind an address no interface carries yet, and systemd.socket(5) recommends it whenever a socket binds a specific IP. In four boots of the VM with this setup, ssh.socket bound 10.91.0.1:22 between 6 and 12 seconds before wg-quick added the address (emulated timing), and SSH answered afterwards with no ordering drop-in:
[   34.631117] labvm systemd[1]: Listening on ssh.socket - OpenBSD Secure Shell server socket.
[   40.298334] labvm systemd[1]: Starting wg-quick@wg0.service - WireGuard via wg-quick(8) for wg0...
[   45.193455] labvm wg-quick[281]: [#] ip -4 address add 10.91.0.1/24 dev wg0
[   46.384665] labvm systemd[1]: Finished wg-quick@wg0.service - WireGuard via wg-quick(8) for wg0.
Check the real listener
Two familiar checks mislead in socket mode. sshd -T reads the config files, so it prints listenaddress 10.91.0.1:22 as soon as the file exists, even while sshd still serves 0.0.0.0:22 after a skipped reload (shown with an emulated hand-off of the stock socket). And ss -tlnp | grep sshd finds nothing until the first connection:
LISTEN 0 4096 10.91.0.1:22 0.0.0.0:* users:(("systemd",pid=1,fd=66))Use systemctl show ssh.socket -p Listen and ss -tln. The release-pocket 24.04 package (1:9.6p1-3ubuntu13) shipped ListenStream=22 with no reload hint in sshd_config; 1:9.6p1-3ubuntu13.12 added a note naming systemctl daemon-reload and systemctl restart ssh.socket for Launchpad bug 2069041, whose Noble task still read In Progress on 2026-11-12. Socket activation has been the default since 22.10, per Ubuntu’s announcement of socket-activated sshd.
Why classic ssh.service fails with “Cannot assign requested address”
With socket activation turned off, the listener depends on boot order. sshd binds 10.91.0.1 itself, and ssh.service starts after network.target while wg-quick@wg0 waits for network-online.target, so sshd runs before the address exists. It logs “Cannot assign requested address” and exits with status 255.
[   38.162982] labvm systemd[1]: Starting ssh.service - OpenBSD Secure Shell server...
[   44.344398] labvm sshd[266]: error: Bind to port 22 on 10.91.0.1 failed: Cannot assign requested address.
[   44.367085] labvm sshd[266]: fatal: Cannot bind any address.
[   44.422578] labvm systemd[1]: ssh.service: Main process exited, code=exited, status=255/EXCEPTION
[   45.627742] labvm systemd[1]: Starting wg-quick@wg0.service - WireGuard via wg-quick(8) for wg0...
[   49.051546] labvm wg-quick[276]: [#] ip -4 address add 10.91.0.1/24 dev wg0
# systemctl show ssh.service -p Result -p ExecMainStatus -p NRestarts
Result=exit-code
NRestarts=0
ExecMainStatus=255
The unit has Restart=on-failure, but also RestartPreventExitStatus=255, so the restart counter stayed at zero and connections to both the tunnel address and the public NIC were refused. sshd -t, which the unit runs as ExecStartPre, returned 0 on the same config. Servers land in this mode through README.Debian’s procedure for leaving socket activation (mask the generator, disable ssh.socket, enable ssh.service).
In classic mode, order sshd after the tunnel with a drop-in on ssh.service:
# server, classic ssh.service only
sudo mkdir -p /etc/systemd/system/ssh.service.d
sudo tee /etc/systemd/system/ssh.service.d/10-after-wg.conf <<'EOF'
[Unit]
Wants=wg-quick@wg0.service
After=wg-quick@wg0.service
EOF
sudo systemctl daemon-reload
With it, sshd started after wg-quick finished and logged Server listening on 10.91.0.1 port 22. net.ipv4.ip_nonlocal_bind = 1 in a file under /etc/sysctl.d/ also let classic sshd bind at boot, but it applies to every IPv4 socket on the host, so we would use the drop-in.
Do not put that drop-in on ssh.socket. The socket is ordered before sockets.target, which basic.target pulls in, and wg-quick@wg0 starts after basic.target, so After=wg-quick@wg0.service on the socket closes a loop. At boot, systemd broke it by deleting a job:
[   15.289465] labvm systemd[1]: basic.target: Found ordering cycle on sockets.target/start
[   15.289920] labvm systemd[1]: basic.target: Found dependency on ssh.socket/start
[   15.290376] labvm systemd[1]: basic.target: Found dependency on wg-quick@wg0.service/start
[   15.290495] labvm systemd[1]: basic.target: Found dependency on basic.target/start
[   15.290756] labvm systemd[1]: basic.target: Job sockets.target/start deleted to break ordering cycle starting with basic.target/start
SSH still answered in that boot, yet sockets.target was never reached. systemd-analyze verify ssh.socket printed nothing about the cycle, while systemd-analyze verify basic.target showed it and still exited 0, so read the target’s output whenever you change ordering.
Reference: back to socket mode
README.Debian documents only the way out. To come back, remove its generator mask and run what the package’s postinst runs when it moves older installs to socket activation; this path was not reproduced, so use the console:
# server console, classic mode only
sudo rm /etc/systemd/system-generators/sshd-socket-generator
sudo systemctl disable --now ssh.service
sudo systemctl daemon-reload
sudo systemctl unmask ssh.socket
sudo systemctl enable --now ssh.socketArm a rollback, then move the listener
Before the reload that restricts SSH to the VPN, schedule a job that undoes the cut-over in ten minutes. Keep two sessions open: one over the tunnel (ssh ops@10.91.0.1 as your normal user, which the OpenSSH rule already allows) for the commands, and one over the public address. The first login to 10.91.0.1 asks to confirm a host key; it is the key 203.0.113.10 already shows, so compare the fingerprints. Read steps 3 to 6 once before you arm the timer.
1. Write the rollback script (server)
Save this as /usr/local/sbin/rollback-ssh.sh, then run sudo chmod 700 /usr/local/sbin/rollback-ssh.sh.
#!/bin/sh
# Undo the SSH cut-over: sshd back on all addresses, port 22 open again.
rm -f /etc/ssh/sshd_config.d/10-wg-only.conf
systemctl daemon-reload
systemctl restart ssh.socket
ufw allow OpenSSH
2. Arm it with systemd-run (server)
$ sudo systemd-run --on-active=10min --unit=ssh-rollback /usr/local/sbin/rollback-ssh.sh
Running timer as unit: ssh-rollback.timer
Will run service as unit: ssh-rollback.service
$ systemctl list-timers ssh-rollback.timer --no-pager
NEXT                        LEFT LAST PASSED UNIT               ACTIVATES
Thu 2026-11-12 10:26:02 UTC 9min -         - ssh-rollback.timer ssh-rollback.service
sudo systemctl stop ssh-rollback.timer cancels it. The timer is a transient unit and does not survive a reboot.
3. Apply the address (server)
printf 'ListenAddress 10.91.0.1\n' | sudo tee /etc/ssh/sshd_config.d/10-wg-only.conf
sudo systemctl daemon-reload
sudo systemctl restart ssh.socket
systemctl show ssh.socket -p Listen
sudo ss -tlnp | grep ':22 '
systemctl show should print only Listen=10.91.0.1:22 (Stream). In the VM, the same reload and restart left a single listener:
LISTEN 0 4096 10.91.0.1:22 0.0.0.0:* users:(("sshd",pid=670,fd=3),("systemd",pid=1,fd=53))An open SSH session survived both restarts of ssh.socket in the VM, though that session was local to the VM. Now start a fresh session from the laptop to 10.91.0.1. If it fails, run sudo /usr/local/sbin/rollback-ssh.sh in a session you still have. If the timer fires before you finish, it has already deleted 10-wg-only.conf and re-added the OpenSSH rule: arm it again and redo the steps from this one.
Close port 22 in UFW and allow SSH only from WireGuard
Delete the public rule in the same form it was created, or port 22 stays open; add the wg0 rule first. ufw delete allow 22/tcp answers “Could not delete non-existent rule” for a rule added as ufw allow OpenSSH, and the reverse fails too.
4. Swap the UFW rules (server)
sudo ufw allow in on wg0 to any port 22 proto tcp
sudo ufw delete allow OpenSSH
sudo ufw status numbered
[...]
To Action From
-- ------ ----
[ 1] 51820/udp ALLOW IN Anywhere
[ 2] 22/tcp on wg0 ALLOW IN AnywhereIf you are unsure of the form, delete by number: sudo ufw delete plus the number from ufw status numbered. With IPv6, each (v6) twin has its own number and needs its own delete, while deleting by form removed both on the VM (Rule deleted, Rule deleted (v6)).
Check from outside, then reboot once
A connection to 203.0.113.10:22 from outside the tunnel should hang until the client times out. A quick “Connection refused” means the packet reached the server and only the missing listener stopped it, so the firewall layer is not doing its part.
5. Probe the public port (laptop), read the drop (server)
The probe leaves over the normal link even with wg0 up; a phone hotspot is better still, since it gives the probe a source address outside both the tunnel and your usual network.
# laptop, as your normal user (not the root shell)
ssh -o ConnectTimeout=8 ops@203.0.113.10
ssh ops@10.91.0.1 'echo SSH_CONNECTION=$SSH_CONNECTION'

# server
sudo journalctl -k -b | grep 'UFW BLOCK' | grep 'DPT=22 '
In the VM, the tunnel login worked, and a probe from the host (SRC=10.0.2.2) left the line to look for, a [UFW BLOCK] entry with DPT=22:
SSH_CONNECTION=10.91.0.2 43136 10.91.0.1 22

Nov 12 12:18:32 labvm kernel: [UFW BLOCK] IN=ens2 OUT= SRC=10.0.2.2 DST=10.0.2.15 LEN=44 [...] PROTO=TCP SPT=33238 DPT=22 WINDOW=65535 RES=0x00 SYN URGP=0
6. Cancel the timer and reboot (server)
sudo systemctl stop ssh-rollback.timer
sudo reboot

# after the reboot, over the tunnel
sudo journalctl -b -o short-monotonic --no-pager -u ssh.socket -u wg-quick@wg0 -u ufw | grep -E 'Listening|Finished|Starting'
sudo journalctl -b --no-pager | grep -iE 'ordering cycle|deleted to break'
The second journal command should print nothing; the first should show the socket listening before the tunnel comes up, as in the VM:
[   26.460869] labvm systemd[1]: Starting ufw.service - Uncomplicated firewall...
[   32.406440] labvm systemd[1]: Listening on ssh.socket - OpenBSD Secure Shell server socket.
[   36.835308] labvm systemd[1]: Finished ufw.service - Uncomplicated firewall.
[   40.382278] labvm systemd[1]: Starting wg-quick@wg0.service - WireGuard via wg-quick(8) for wg0...
[ 42.623170] labvm systemd[1]: Finished wg-quick@wg0.service - WireGuard via wg-quick(8) for wg0.Repeat the reboot check after the 26.04 release upgrade as well.
Behind the UFW rules in step 4
Do not run this transcript of the delete mismatch: its first command re-adds the public rule, and its last command removes it again.
# demonstration from the reproduction; do not run
$ ufw allow OpenSSH; ufw delete allow 22/tcp
Rule added
Could not delete non-existent rule
$ ufw status | grep -i -E "openssh|22/tcp "
22/tcp on wg0              ALLOW       Anywhere
OpenSSH                    ALLOW       Anywhere
$ ufw delete allow OpenSSH
Rule deleted
We would keep the interface rule over the common ufw allow from 10.91.0.0/24 to any port 22 proto tcp because of what each one matches, as sudo iptables -S ufw-user-input shows:
-A ufw-user-input -i wg0 -p tcp -m tcp --dport 22 -j ACCEPT
-A ufw-user-input -s 10.91.0.0/24 -p tcp -m tcp --dport 22 -j ACCEPT
The source rule matches a 10.91.0.x source arriving on any interface, the public one included. The wg0 rule accepts only what arrives on wg0, where WireGuard has already checked the source against the peer’s AllowedIPs: a ping sourced from 10.91.0.9 through the tunnel got 100% loss, because the server accepts only 10.91.0.2 from that peer. A forged 10.91.0.x packet on the public NIC was not sent in the reproduction.
The wg0 rule also works when the firewall loads before the interface exists: in the emulated reboot above, ufw.service finished at 36.8 s, wg-quick started at 40.4 s, and SSH over the tunnel worked afterwards.
If you are locked out of the VPS after closing SSH
Sign in on the VNC console with the password account, then check the mode before you undo anything: systemctl is-enabled ssh.socket ssh.service.
If it prints enabled and disabled (socket mode), sudo /usr/local/sbin/rollback-ssh.sh puts sshd back on 0.0.0.0:22 and [::]:22 and re-adds the OpenSSH rule; when the timer fired it in the VM, the result was:
LISTEN 0      4096         0.0.0.0:22        0.0.0.0:*    users:(("sshd",pid=593,fd=3),("systemd",pid=1,fd=54))
LISTEN 0      4096            [::]:22           [::]:*    users:(("sshd",pid=593,fd=4),("systemd",pid=1,fd=55))
OpenSSH                    ALLOW       Anywhere
OpenSSH (v6)               ALLOW       Anywhere (v6)
If it prints disabled and enabled (classic mode) and the journal has the bind error, the rollback script does not fit: add the ssh.service drop-in and run sudo systemctl start ssh.service; with wg0 up, sshd can bind 10.91.0.1.
With SSH back, find the cause before you try again:
- If
systemctl is-active wg-quick@wg0is notactive, the tunnel never came up, andjournalctl -b -u wg-quick@wg0shows which wg-quick step failed. - Right after a WireGuard restart on the server, the first SSH attempt in the reproduction timed out at
ConnectTimeout=8; a ping to 10.91.0.1 from the laptop brought a new handshake, and the next login worked, so ping before you connect.
Step 6 reboots with no timer armed. If SSH stays down after it, the VNC console on your Hostry VPS with Ubuntu 24.04 is where you run the rollback script by hand.